


Welding
Choosing a welder
As I had already mentioned before, I have never welded in my life. As usual, I started with borrowing some books and video tapes about welding from a library. I learned the basics of different types of welding such as stick, MIG and TIG welding. I also focused on choosing the right technique and a welding machine for a steel sailboat construction.
The absence of a shed played an important role here. Windy environment is not good for welding techniques that use a shielding gas such as MIG or TIG. Most books suggest using stick welding for an outside construction. Among mentioned three types of welding, MIG, also referred as GMAW, was the easiest one to learn and provided good welds. The wind problem could be solved by using flux-cored wire alone or in a combination with a shielding gas.
To determine the correct welder power, one should consider the maximum thickness of a material to be welded. In my case, the thickest plates I had were 6 mm or about a quoter of an inch. Roughly 200 A is required to weld such steel.
I had to do some 220 volt wiring in my house: I mounted one outlet in my garage and one outside. For the outside plug I used GFCI type 50A breaker - that was expensive, not to mention the wire and a 100-foot welder cable cost!
Another very important parameter of a welder is its duty cycle expressed as a percentage of 10 minutes interval; for example, 40% duty cycle at certain power means that you can weld at that power for 4 minutes and wait 6 minutes for a welder to cool. Another words, the higher the duty cycle, the more job can be done within given amount of time.
Miller or Lincoln Electric
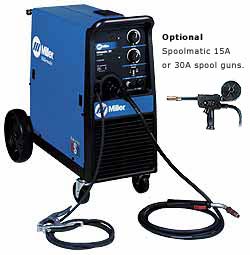
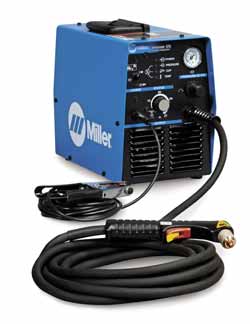
Based on the above requirements, I came up with two models Miller Millermatic 251 and Lincoln Electric Power MIG 255C. They both had very similar characteristics. It happened that at the time I was purchasing it, local suppliers had better deal on Millermatic, so I got one. I also got Miller Spectrum 375 plasma cutter.
Gasless welding
As I discovered welding the hull, the gasless flux-cored wire welding is what you need to build a boat outside with no shed, upright.
It is similar to stick welding but welds quality is close to MIG welding.
The main pros of gasless flux-cored wire welding:
- Wind is not a problem at all! A windy day is even better because the wind will blow away harmful fumes.
- Like stick welding, it can tolerate light rust
- Overhead welding is done with the same ease as down hand, no kidding, there is no difference! Therefore, building a hull upright is no longer a problem.
- No gas, no nozzle, hence, possibility of welding in tight spaces.
- No gas, no heavy cylinder. It is much easier to move a weldor around a boat without it. No cylinder rental fee as well.
- Gasless welding requires much less power, therefore, depending on your weldor, it may be possible to weld continuously.
Cons are the following:
- Harmful fumes. Ventilation is a must.
- Slower than MIG that might result in more heat transfer to metal, although a voltage and a current is much less than with MIG. Care should be taken to avoid distortion, usually just by following the best welding practices. My experience shows that the distortion is less than with MIG and because it is slower, a person has more control over welding.
- Gasless flux-cored wire is more expensive than regular one.
One has to be careful when buying gasless flux-cored wire. There are at least two types of it on the North American market: E71T-GS and E71T-11. The first one is used primarily for welding thin galvanized steel, the second one is more universal. From my experience E71T-GS is no good for a sailboat welding, because the seams that it produces crack when they cool down. E71T-11 is the one that you need.
Grind or not to grind
This may be a rhetoric question. In the past it was considered a norm not to grind outside underwater seams. Now the majority seems to have an opposite opinion - grind. But what about the inside welds?
Hull's skin welds should probably be left unground to avoid excessive weakening since they are already ground on the other side. My question is about stiffeners-to-skin fillet welds. Should they be ground or just wire brushed or sandblasted?
In my opinion, there are two aspects of this matter. Grinding provides smooth surface and supposedly better paint adherence. On the other hand, it somewhat weakens a weld.
The inside fillet welds besides two coats of a primer are covered by an insulation sprayed-in foam and therefore are not subject to any mechanical influences. Depending on the foam and the quality of its application, there should be even no condensation and water there either. The question now becomes "How do modern primers behave under such mild conditions?".
Most paint manufactures specify surface preparation for various conditions. The more severe the environment, the better surface preparation is required. Those requirements are mostly deal with cleanliness rather than smoothness, i.e. demand particular level of sandblasting but the principal I guess could be extended to smoothness.
One of the arguments against grinding is that if it was ok not to grind underwater welds, which are under by far harsher conditions than inside welds, then there should be no reason to grind the inside welds as well. Moreover, some corner welds are not reachable with a grinder and would stay unground anyway. Below are three pictures of a fillet weld between a longitudinal member and a hull's skin. The first one from the left is after welding with gasless flux-cored wire, hence, the slug. The second one is after cleaning with a wire brush wheel. Sandblasing will probably do a better job. And the third one is after grinding with a 7" angle grinder.

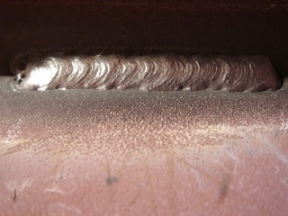
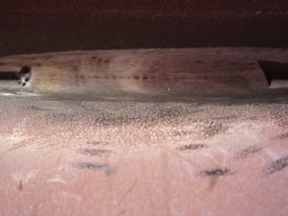
Aesthetically, the last one looks much better than the second. But does a paint care? Or even more precisely "Is there a paint that doesn't care?"
- What primer will equally accept both weld surfaces as long as they are free of any contaminates, rust and debries?
- Or which family of zinc-rich primers (organic, inorganic or epoxy) is better suitable to this kind of job and better accept a foam on its top?
- Would an application of a penetrating sealer make more sense prior to priming unground welds? A sealer is probably a good idea as it could get underneath of stringers and frames but again what type: epoxy or solvent base such as calcium sulfonate?
Final welding
Final welding took almost the entire summer, part time, of course, meaning evenings, weekends and two weeks of my vacation. Frameful design is indeed labour intensive. The kit no doubt saves time but 350 parts are too many for a 38-foot hull considering that there were no parts for fabrication of doors, windows, portlites, hatches, companionway, bulwarks, etc. I compare it to frameless ideas such as origami boats. Well, on the bright side, it is very strong and rigid. I still like it because of that.
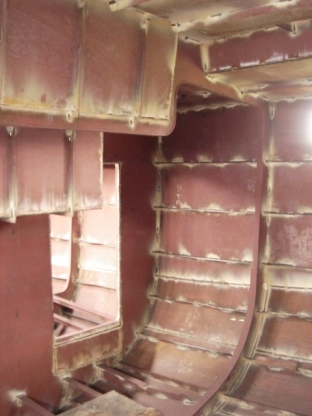
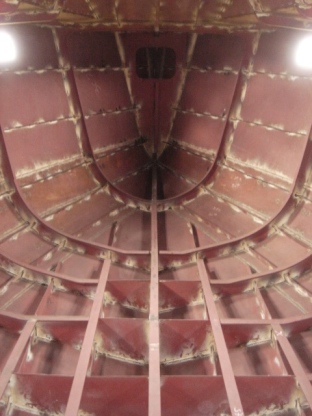
Intersections
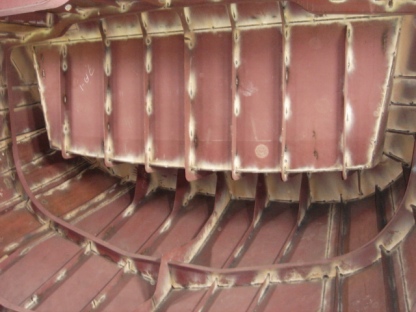
As you see on the pictures, the flanges are everywhere and intersections of longitudinal and transversal members are welded on all sides. Bruce emphasises that the intersections are the corner stones in boat's overall strength. Floor beams are made of 50x50x5 mm t-bars and spaced about 30 cm o.c.
Flatbar reinforcement
Most plates are reinforced with flat bars. 5 cm fillet welding is done on the opposite sides every 10 cm.
Below waterline seams
Plate seams that are below the waterline are welded continuously on both sides. I tempted to do the same for the above waterline seams as well. Fillet seams are welded only on one side and corner seams are backwelded with 5 cm welds spaced 10 cm apart according to the welding specification of the designer.
The bottom plates are continuously welded to the stem on both sides inside contrary to the naval engeneer's advice to weld it on one side only.